1.Head and Body
0 / 19 rangs terminés
Nombre de mailles par tour
6 → 42 → 6 sts
Diagramme de mailles
Symboles de crochet standard pour ce tour — lecture dans le sens horaire depuis le haut.
Ordre écrit
6 sc in MR (6)
×6
Légende
- MR
- sc
Intermédiaire · Gratuit
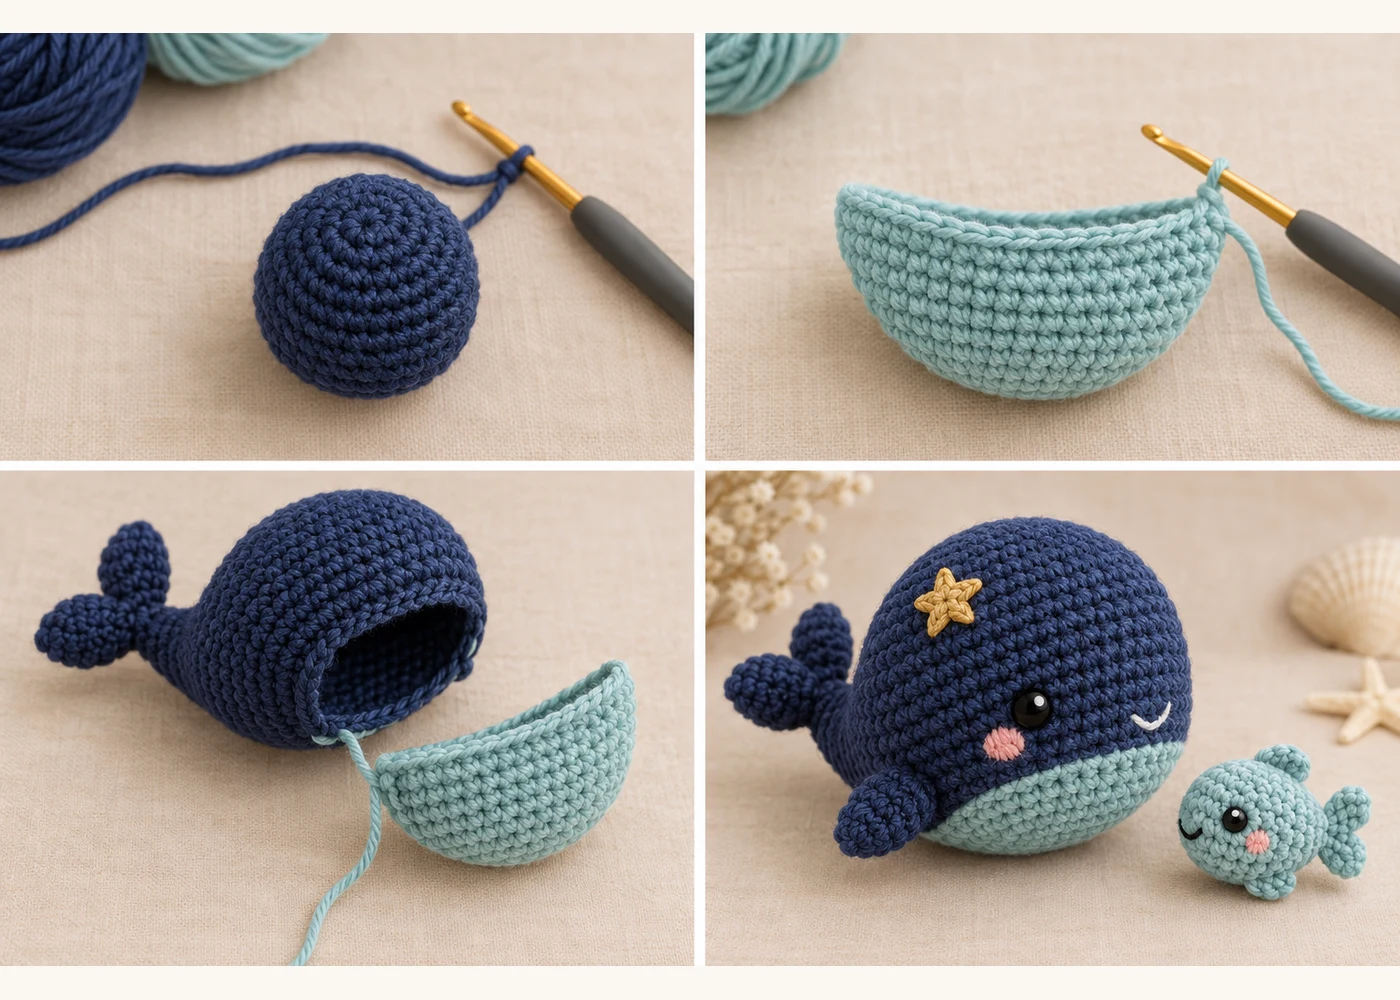
Une mignonne baleine amigurumi de poche de 6" (15 cm) réalisée en bleu marine doux avec un ventre vert-menthe pastel, des joues brodées en rose et une petite étoile appliquée dorée. Comprend un petit poisson amovible de 1,5" qui se clipse dans une poche ventrale cachée et une petite boucle crochetée pour un porte-clés ou un mousqueton.
Techniques
Parcours
Suivez le parcours de la première pièce au projet fini. Touchez une étape pour y aller.
Pièces crochetées
Chaque pièce numérotée se crochète à part, puis s’assemble.
Couleurs suggérées
Les couleurs indiquées sont des suggestions — choisissez celles que vous préférez.
Étapes visuelles
La mosaïque suit le parcours — chaque panneau correspond à une étape du modèle.
Avant de commencer
Toutes les pièces s’enchaînent. Choisissez tableau, un par un, ou liste — enregistré sur cet appareil.
0 / 19 rangs terminés
Nombre de mailles par tour
6 → 42 → 6 sts
Diagramme de mailles
Symboles de crochet standard pour ce tour — lecture dans le sens horaire depuis le haut.
Ordre écrit
6 sc in MR (6)
Légende
0 / 4 rangs terminés
Nombre de mailles par tour
6 → 12 → 18 → 18 sts
Diagramme de mailles
Symboles de crochet standard pour ce tour — lecture dans le sens horaire depuis le haut.
Ordre écrit
6 sc in MR (6)
Légende
0 / 4 rangs terminés
Étape 1 sur 5
Row 1
Ch 10, sc in 2nd ch from hook and across (9)
Astuces débutant
Nombre de mailles par rang
9 → 9 → 7 → 7 sts
Diagramme de mailles
Diagramme en rangs avec symboles standard — lecture de gauche à droite.
Rang 1 · left → right
9 sts
ch ×10
sc ×9
Ordre écrit
Ch 10, sc in 2nd ch from hook and across (9)
Légende
0 / 4 rangs terminés
0 / 2 pièces faites
Nombre de mailles par tour
6 → 12 → 12 → 9 sts
Diagramme de mailles
Symboles de crochet standard pour ce tour — lecture dans le sens horaire depuis le haut.
Ordre écrit
6 sc in MR (6)
Légende
0 / 3 rangs terminés
Étape 1 sur 4
Row 1
Ch 6, sc in 2nd ch from hook and across (5)
Astuces débutant
Nombre de mailles par rang
5 → 5 → 3 sts
Diagramme de mailles
Diagramme en rangs avec symboles standard — lecture de gauche à droite.
Rang 1 · left → right
5 sts
ch ×6
sc ×5
Ordre écrit
Ch 6, sc in 2nd ch from hook and across (5)
Légende
0 / 1 rangs terminés
Étape 1 sur 2
Rnd 1
MR, *(ch 5, sl st to MR) repeat 5 times to create 5 loops; fasten off (5 loops)
Astuces débutant
Diagramme de mailles
Symboles de crochet standard pour ce tour — lecture dans le sens horaire depuis le haut.
Ordre écrit
MR, *(ch 5, sl st to MR) repeat 5 times to create 5 loops; fasten off (5 loops)
0 / 2 pièces faites
Using blush yarn, embroider two small circles beneath eyes using satin stitch or a few surface slip stitches; secure and weave ends
0 / 6 rangs terminés
Étape 1 sur 7
Rnd 1
6 sc in MR (6) — work in pastel teal (color B) (6)
Astuces débutant
Nombre de mailles par tour
6 → 12 → 18 → 18 → 12 → 6 sts
Diagramme de mailles
Symboles de crochet standard pour ce tour — lecture dans le sens horaire depuis le haut.
Ordre écrit
6 sc in MR (6) — work in pastel teal (color B) (6)
Légende
0 / 3 pièces faites
Ch 4, sc in 2nd ch from hook and across (3), fasten off leaving tail (3)
For tail fin: Ch 6, sc in 2nd ch from hook and across (5), fasten off leaving tail
0 / 1 rangs terminés
Étape 1 sur 1
Rnd 1
Ch 12, join with sl st into first ch to form loop; fasten off leaving tail for sewing (12)
Astuces débutant
Diagramme de mailles
Symboles de crochet standard pour ce tour — lecture dans le sens horaire depuis le haut.
Ordre écrit
Ch 12, join with sl st into first ch to form loop; fasten off leaving tail for sewing (12)
1. Position and sew the belly pocket: Turn the finished whale body inside out (if possible) or work from the opening left when attaching components. Align the pocket rim with the belly center rows (rounds 11–13 area). Using the long tail from the pocket, whipstitch or ladder stitch the pocket rim to the inside of the whale's underside, leaving the top of the pocket open. If using a snap, sew one half of the sew-on snap to the inside top edge of the pocket at this time.
2. Attach the baby fish snap/loop: Sew the matching snap half or loop to the top center of the baby fish using the tail left from finishing the fish. Test the snap closure to ensure the fish secures reliably inside the pocket.
3. Attach tail: Fold the tail rectangle in half so the base edges meet; seam the base edge with whipstitch to create a slight pointed base. Use the long tail to securely sew the tail to the back (rear) of the whale. Stuff slightly into the seam between body rounds for a smooth attachment.
4. Sew on side fins and dorsal fin: Position side fins evenly on either side of the body (around rounds 10–12) and the dorsal fin centered on the top back. Use the long tails to sew securely with invisible mattress stitch; tack down edges so fins sit naturally.
5. Attach star appliqué: Center the gold star near the eye or cheek area. Use a couple of small, tight stitches to sew the star flat to the whale's head so it will not come loose.
6. Add keyring loop: Fold the crocheted loop in half and stitch it into the top seam of the whale (near the head), or attach a split ring to the loop. Make sure it is sewn through several body rounds so it's secure. If including a metal keyring, ensure it is attached away from any small children; otherwise omit metal hardware and only attach a fabric loop for safety.
1. Weave in all ends securely with a yarn needle. Use multiple passes to bury tails so they do not work loose.
2. Embroider cheeks and facial details: With blush yarn, embroider two small cheek circles under the eyes. With black yarn or embroidery floss, embroider small eyes if not using safety eyes. Secure knots on the inside and weave ends.
3. Final shaping and trimming: Make any minor adjustments to stuffing to shape the whale. Trim any visible tails. If seams are visible, use matching yarn to tidy them.
4. Install snaps and test: Attach the two halves of the sew-on snap (one inside pocket, one on the baby fish) and test insertion/removal several times to ensure reliable fastening. For infant-safe versions, use sew-on fabric loop or stitched closure only (no snaps).
5. Safety check: If you used safety eyes or metal keyrings, double-check attachment security. For toys intended for children under 3, remove any metal hardware and use all-embroidered features and sewn fabric snaps only.
6. Block lightly if desired: Light steam or pin to shape the whale for a neat finish (avoid direct heat on synthetic yarns).

Un mignon sachet hibou amigurumi de 7" réalisé en fil DK, avec une pochette amovible pour lavande à cordon. Comprend un petit masque de sommeil amovible qui sert aussi de boucle de suspension — extérieur lavable, pochette amovible pour lavande séchée.
View pattern
Joli sac bandoulière structuré, crocheté en fil mélange coton de poids DK, avec un panneau ombré rose poudré → pêche → crème et un visage de lama endormi brodé. Comprend une selle amovible ornée d'un pompon et d'un gland, une poche intérieure à pression pour pièces, des instructions pour une doublure légère en coton et des notes sur la quincaillerie pour une finition soignée.
View pattern