1.Head and Body
0 / 19 vueltas hechas
Puntos por ronda
6 → 42 → 6 sts
Diagrama de puntos
Símbolos de crochet estándar para esta ronda — se lee en sentido horario desde arriba.
Orden escrito
6 sc in MR (6)
×6
Leyenda
- MR
- sc
Intermedio · Gratis
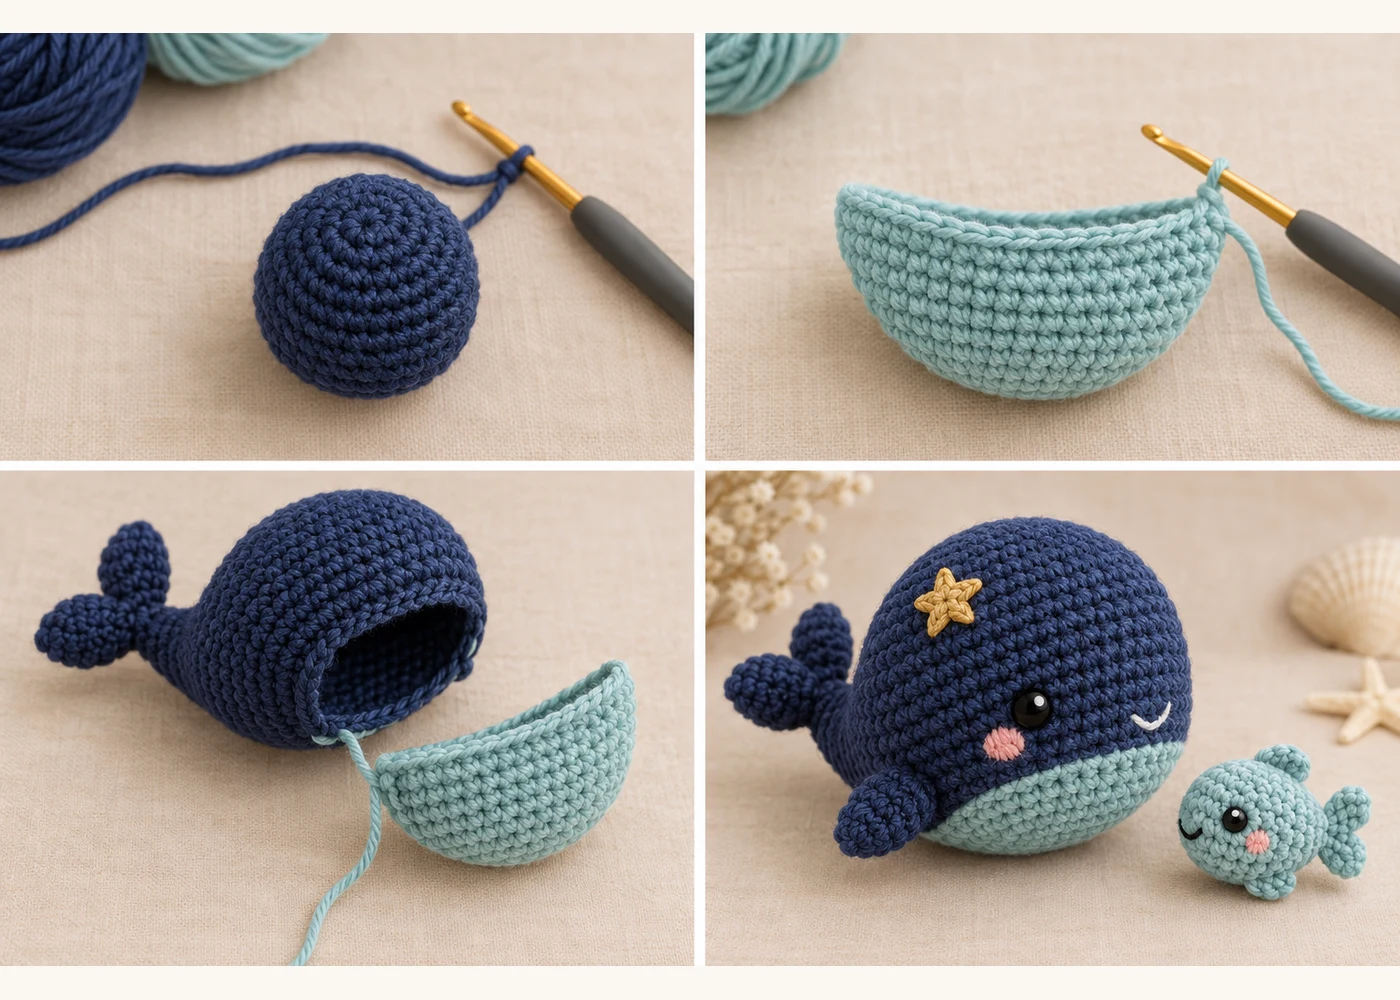
Una adorable ballena amigurumi de bolsillo de 6" (15 cm) tejida en azul marino suave con vientre verde azulado pastel, mejillas bordadas con rubor y un pequeño apliqué de estrella dorada. Incluye un pececito desmontable de 1.5" que se abrocha en un bolsillo oculto del vientre y un pequeño lazo tejido para llavero o mosquetón.
Técnicas
Ruta
Sigue la ruta desde la primera pieza hasta el proyecto terminado. Toca un paso para saltar.
Piezas a crochet
Cada pieza numerada se teje aparte y luego se une al proyecto final.
Colores sugeridos
Los colores mostrados son sugerencias — usa los que prefieras.
Pasos visuales
El collage sigue la ruta — cada panel corresponde a una etapa del patrón.
Antes de empezar
Todas las piezas van en orden. Elige panel, una a una, o lista — se guarda en este dispositivo.
0 / 19 vueltas hechas
Puntos por ronda
6 → 42 → 6 sts
Diagrama de puntos
Símbolos de crochet estándar para esta ronda — se lee en sentido horario desde arriba.
Orden escrito
6 sc in MR (6)
Leyenda
0 / 4 vueltas hechas
Puntos por ronda
6 → 12 → 18 → 18 sts
Diagrama de puntos
Símbolos de crochet estándar para esta ronda — se lee en sentido horario desde arriba.
Orden escrito
6 sc in MR (6)
Leyenda
0 / 4 vueltas hechas
Paso 1 de 5
Row 1
Ch 10, sc in 2nd ch from hook and across (9)
Consejos para principiantes
Puntos por fila
9 → 9 → 7 → 7 sts
Diagrama de puntos
Diagrama en filas con símbolos estándar — se lee de izquierda a derecha.
Fila 1 · left → right
9 sts
ch ×10
sc ×9
Orden escrito
Ch 10, sc in 2nd ch from hook and across (9)
Leyenda
0 / 4 vueltas hechas
0 / 2 piezas hechas
Puntos por ronda
6 → 12 → 12 → 9 sts
Diagrama de puntos
Símbolos de crochet estándar para esta ronda — se lee en sentido horario desde arriba.
Orden escrito
6 sc in MR (6)
Leyenda
0 / 3 vueltas hechas
Paso 1 de 4
Row 1
Ch 6, sc in 2nd ch from hook and across (5)
Consejos para principiantes
Puntos por fila
5 → 5 → 3 sts
Diagrama de puntos
Diagrama en filas con símbolos estándar — se lee de izquierda a derecha.
Fila 1 · left → right
5 sts
ch ×6
sc ×5
Orden escrito
Ch 6, sc in 2nd ch from hook and across (5)
Leyenda
0 / 1 vueltas hechas
Paso 1 de 2
Rnd 1
MR, *(ch 5, sl st to MR) repeat 5 times to create 5 loops; fasten off (5 loops)
Consejos para principiantes
Diagrama de puntos
Símbolos de crochet estándar para esta ronda — se lee en sentido horario desde arriba.
Orden escrito
MR, *(ch 5, sl st to MR) repeat 5 times to create 5 loops; fasten off (5 loops)
0 / 2 piezas hechas
Using blush yarn, embroider two small circles beneath eyes using satin stitch or a few surface slip stitches; secure and weave ends
0 / 6 vueltas hechas
Paso 1 de 7
Rnd 1
6 sc in MR (6) — work in pastel teal (color B) (6)
Consejos para principiantes
Puntos por ronda
6 → 12 → 18 → 18 → 12 → 6 sts
Diagrama de puntos
Símbolos de crochet estándar para esta ronda — se lee en sentido horario desde arriba.
Orden escrito
6 sc in MR (6) — work in pastel teal (color B) (6)
Leyenda
0 / 3 piezas hechas
Ch 4, sc in 2nd ch from hook and across (3), fasten off leaving tail (3)
For tail fin: Ch 6, sc in 2nd ch from hook and across (5), fasten off leaving tail
0 / 1 vueltas hechas
Paso 1 de 1
Rnd 1
Ch 12, join with sl st into first ch to form loop; fasten off leaving tail for sewing (12)
Consejos para principiantes
Diagrama de puntos
Símbolos de crochet estándar para esta ronda — se lee en sentido horario desde arriba.
Orden escrito
Ch 12, join with sl st into first ch to form loop; fasten off leaving tail for sewing (12)
1. Position and sew the belly pocket: Turn the finished whale body inside out (if possible) or work from the opening left when attaching components. Align the pocket rim with the belly center rows (rounds 11–13 area). Using the long tail from the pocket, whipstitch or ladder stitch the pocket rim to the inside of the whale's underside, leaving the top of the pocket open. If using a snap, sew one half of the sew-on snap to the inside top edge of the pocket at this time.
2. Attach the baby fish snap/loop: Sew the matching snap half or loop to the top center of the baby fish using the tail left from finishing the fish. Test the snap closure to ensure the fish secures reliably inside the pocket.
3. Attach tail: Fold the tail rectangle in half so the base edges meet; seam the base edge with whipstitch to create a slight pointed base. Use the long tail to securely sew the tail to the back (rear) of the whale. Stuff slightly into the seam between body rounds for a smooth attachment.
4. Sew on side fins and dorsal fin: Position side fins evenly on either side of the body (around rounds 10–12) and the dorsal fin centered on the top back. Use the long tails to sew securely with invisible mattress stitch; tack down edges so fins sit naturally.
5. Attach star appliqué: Center the gold star near the eye or cheek area. Use a couple of small, tight stitches to sew the star flat to the whale's head so it will not come loose.
6. Add keyring loop: Fold the crocheted loop in half and stitch it into the top seam of the whale (near the head), or attach a split ring to the loop. Make sure it is sewn through several body rounds so it's secure. If including a metal keyring, ensure it is attached away from any small children; otherwise omit metal hardware and only attach a fabric loop for safety.
1. Weave in all ends securely with a yarn needle. Use multiple passes to bury tails so they do not work loose.
2. Embroider cheeks and facial details: With blush yarn, embroider two small cheek circles under the eyes. With black yarn or embroidery floss, embroider small eyes if not using safety eyes. Secure knots on the inside and weave ends.
3. Final shaping and trimming: Make any minor adjustments to stuffing to shape the whale. Trim any visible tails. If seams are visible, use matching yarn to tidy them.
4. Install snaps and test: Attach the two halves of the sew-on snap (one inside pocket, one on the baby fish) and test insertion/removal several times to ensure reliable fastening. For infant-safe versions, use sew-on fabric loop or stitched closure only (no snaps).
5. Safety check: If you used safety eyes or metal keyrings, double-check attachment security. For toys intended for children under 3, remove any metal hardware and use all-embroidered features and sewn fabric snaps only.
6. Block lightly if desired: Light steam or pin to shape the whale for a neat finish (avoid direct heat on synthetic yarns).

Un lindo saquito aromático amigurumi de búho de 7" tejido con hilo de peso DK y con una bolsita extraíble para lavanda con cordón. Incluye una pequeña máscara de dormir extraíble que también sirve como lazo para colgar — exterior lavable; la bolsita se puede extraer para lavanda seca.
View pattern
Lindo bolso bandolera estructurado tejido a crochet con hilo mezclado de algodón de grosor DK, con un panel ombré rosa empolvado→durazno→crema y una cara de llama somnolienta bordada. Incluye una montura removible con borla y pompón, un bolsillo interior para monedas con broche a presión, instrucciones para un forro interior ligero de algodón y notas sobre herrajes para un acabado pulido.
View pattern